NEED ADVICE?
![]() 1300 365 565
1300 365 565

STEP BY STEP INSTRUCTIONS ON HOW TO BUILD YOUR VEGETABLE GARDEN
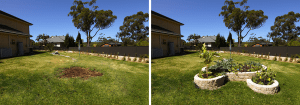
Step 1: Mark out the shape of your garden patch
Be aware of how much space and depth is required to plant the items you want, and how much space is available in your outdoor room. Once you have a rough idea, mark out the shape of your garden patch. For square shapes, set up a string line, for curved or circular areas you can use the garden hose to make the shape. Once you have defined your shape, using a marking paint, mark a line on the ground around the shape.
TIP: Make sure you include space for you to work around and walk around each garden patch – You don’t want to accidentally step on any delicate seedlings growing beneath the soil.
Step 2: Excavate a trench
Remove turf and debris from the area to avoid them growing back through your new garden patch. Then, around the shape of your garden patch which has been marked out, excavate a trench approximately 50-100mm wider than the block and approximately 200mm in depth.
TIP: Place turf in green bins but save the soil – You can reuse this in the first course of your soil mix in the raised garden patch.
Step 3: Bring in roadbase for the footing of your veggie patch
Spread roadbase throughout your footing to a depth of approximately 50mm. Once you have covered the entire trench, compact the roadbase using a plate compactor (wacker – packer) or compacting tamper. Go over the area a couple of times to ensure it is well compacted and flat.
TIP: Use rebase, a recycled roadbase for your footing. It’s better for the environment and could be cheaper too!
Step 4: Screed a sand and cement mix over the roadbase
Prepare a sand and cement mix of 4:1 and using a timber float, spread the mix over the roadbase to a thickness of approximately 30mm. It is very important to get the sand and cement mix level.
Use a spirit level and work in small sections through your trench constantly checking level both ways, side to side and front to back.
TIP: Your base needs to be level – If your wall starts level, it will finish level, so this is an important step to spend time on!
Step 5: Begin laying the first course of blocks
The fun part! Start at one end and place blocks onto the screeded sand and cement mix. Using a rubber mallet, gently tap the blocks into position and using your spirit level, check that each block is level with the one before it; side to side and front to back.
After you have laid the first block, continue laying blocks around the trench. Blocks should be ‘butted’ against one another so they gently touch together. Continue laying blocks and checking for level until you finish the first course of blocks.
Step 6: Continue laying blocks
You can continue laying blocks by simply stacking them on top of one another – just like using children’s blocks! Make sure you have a small hand broom to sweep dirt and debris of the top of the course below to ensure you’re laying blocks on a nice flat surface.
Continue laying blocks to desired height, noting the maximum unreinforced heights allowable, specified for your retaining wall.
Step 7: Installing the capping units
You’re almost there! Depending on your chosen blocks, you may want to add capping stones to the top of your garden wall.
Using a suitable landscape grade outdoor adhesive (such as landscape liquid nails) place 4 ‘blobs’ of adhesive on the top of each block on your top course. Once you have done this, firmly place the capping unit into place on top of the glue. Repeat this step until all capping units are firmly secured to the top of your wall blocks. Continue to check the level on this final course. You will finish with a nice, clean, flush looking garden wall and the blocks won’t be rocky or move from position.
Step 8: Bring in the new soils and mulch
Use a wheelbarrow to bring in your soils, mulches and potting mix. Spread the soils evenly throughout your new veggie patch.
You want the soil to come to about half way up the top of your capping unit or the highest course of blocks.
TIP: Consider using organic soils so your family’s fresh fruit and veggies are of the highest quality
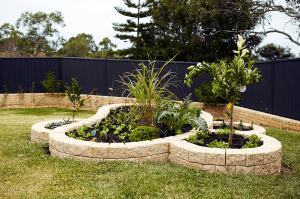
Step 9: Planting out and finishing off
Now the best part-planting your new outdoor green grocer!
Be sure to consider layering your plants, starting with taller fruit trees in the centre and work out towards veggies and herbs, which will be handy in the kitchen year round!
Step 10:
Now just finish up by hosing down blocks and watering your newly planted garden patch!